It's a situation we've all been through: deleting a file by mistake or, later, coming to the conclusion that, after all, we really needed that photo, PDF or spreadsheet. Here comes into play the WinfrGUI, a free program that will help us start looking for lost files.
 When we realize that we've accidentally deleted an important file, the most obvious reaction is to see if it's still in the Windows 'Recycle Bin' – if not, the best thing to do is start thinking about a file recovery program. However, many of these (free) tools that exist, place a limit on the amount of data or recently deleted files that we can recover: for more, just by purchasing the application.
WinfrGUI does not suffer from this problem and allows you to recover unlimited photos, videos and documents, both from PC disks and from external drives or USB sticks – it is, therefore, our choice for this “search and rescue” guide.
- Download WinfrGUI from the website winfr.org – just click on the green button that is on the site's entry page. Install the program (it is not available in Portuguese, so in the language we chose English); when clicking on 'Finish', in the last window of this process, a browser page opens confirming that the installation was successful and the program starts
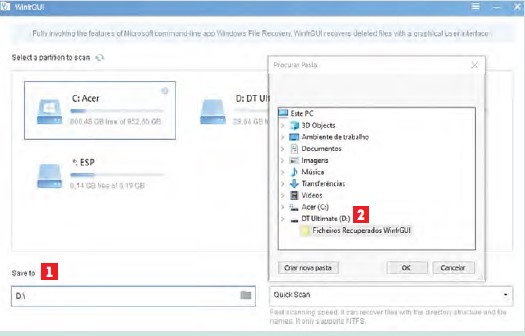
- In the main window of the program, select the unit or partition in which you want to search for deleted files – we chose the main hard drive ('C:Acer'). Now, below, you have to click on the blue folder that is in the 'Save to / Please choose' field to determine where you are going to save the restored files: we have to choose a different location from the partition where we are doing the search. We decided to create a folder on a pen drive ('D: DT Ultimate') which we named 'WinfrGUI Recovered Files'. To complete this step, click 'OK'.
- In the 'Scanning mode' menu we choose the type of analysis that WinfrGUI does to the disk: for drives formatted in NTFS, we have the 'Quick Scan' (faster, but finds fewer deleted files) and the 'Deep Scan' (slower, more complete). If we have disks or pens formatted in FAT32 (or any other type), we can only choose 'Deep Scan'. After making the decision, click on the 'Start Recovery' button so that the program starts checking the disk for files.
- The WinfrGUI progress bar will show the percentage of the scan done in real time, along with the elapsed time and the remaining estimated time. If you don't want to wait until the end, click on 'View Recovered Files' to see details of the files that the program managed to restore up to a certain point in time; you can also press 'Stop' to finish immediately.
- Once the scan has finished, WinfrGUI tells us the number of files it has recovered (in our case, 680) and confirms the folder where it has been saved: inside the one we created, there is another one with the name of the type of analysis carried out and in which unit ('Quick Scan C') and an indication of the date and time the scan was made – it's the set of numbers that appear all in a row. Now, click on the 'View Recovered Files' button to see the recovered files: they appear organized in sub-folders, according to their format or type. WinfrGUI also generates a record (log) of all restored files: 'RecoveryLog.txt'.
- If you want to search for more files on other drives, click on 'Back To Homepage' and choose a new one. To save time searching, click on 'Advanced settings' to enter WinfrGUI's advanced options. Here, you can specify what types of files are scanned – for example, if you're just looking for photos you've accidentally deleted, you should just select 'Photos' 2 ; you don't need to be including all other types of files in the scan, which will only increase the waiting time.
- In WinfrGUI's advanced options we can also select another filter: the folders where the program looks for deleted files – once again, we avoid wasting time with scans that will also find what we don't need. If we click on the plus sign ('+') next to a folder, we can further narrow the search to specific sub-folders. Finally, click on 'OK' to save the chosen filters and return to the initial screen – now just do a new scan (which will be faster), as we explained in steps 2 and 3.